|

|
|
|
|
||
Front Radar Detector Installation
|
||||||||||
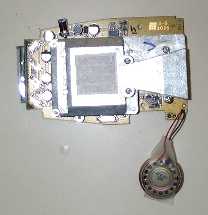 Figure 2. Circuit board of Bel 860 unit. |
Figure
2 shows the printed circuit board removed from the outer plastic case of
the unit. Removing the board involves opening up two screws on the
underside of the unit. It the splits apart. However getting the board
completely out involves forcing off the back section of the cover
surrounding the LED display. There is a trick to this. It is done by
pressing on two plastic notches on the inside of the unit. I find however
you can force things open without braking things. The board is very
strong and seems to stand a lot of abuse. There is one very
important thing to remember here however that cost me one unit. On
no account should you let the contacts to the speaker (now hanging free)
make contact with the metal cone of the detector with the power on.
Immediately cover the back of the speaker with insulation tape as shown in
figure 1 when you disassemble the unit.
Radar Detector Position. I considered a number of locations on the car for the front facing radar detector. Some people like to put a unit behind the grill of the front brake air intakes. Not only is this difficult to do, and keep dry, but the position is so low to the ground you get poor forward radar detection. One place I did try to put the unit was inside the headlight assembly. I tried in vain to get the lighting unit out of the car but found I could not do it without removing the whole front section of the car. This was more work than what I had in mind. |
|||||||||
| Finally I tried attaching the unit to the inside of the front trunk (using epoxy glue and a metal bracket to maintain the correct angle when the hood lid was closed). I found the silver color paint of the car absorbed much of the signal strength. This may work for other colors, but it seems not so for "Titanium" colored Diablo's. I finally settled on a simple location -- directly under the sunshade on the passenger's side of the car. | ||||||||||
|
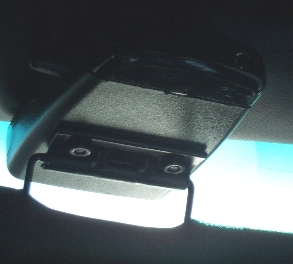
There are a number of ways this can be done. Depending on how much time you have, you can perfect the arrangement. I wanted to use the original case of the Bel unit, so I could use the switches etc of the unit. I started with the top half of the Bel's plastic cover. I put a small amount of auto body-filler paste on the middle section of the outside of the case to raise the surface and make it flat. Once it had dried, I filed it down and sprayed it black. I the drilled two holes through it such that it could be attached to the roof panel of the Diablo using the holes and treads that were used to hold the sun shade in place. The body filler wedge step is necessary to keep the direction of the unit facing forward and horizontally. If you attach the upper plastic shell directly, it will be pointing downwards about 30 feet in front of the car. This kills weak radar signals. Also it is necessary to have the unit forward and close to the window itself. This way the sunshade can be raised completely yet the radar unit cannot be seen outside the car. The sunshade is then attached via two screws to the bottom plastic cover of the Bel unit. See figure 3. Make sure these screws are small and do not take up too much room on the inside of the unit. I filed the tops of mine down. They should be covered on the inside of the unit with a layer of insulation tape to avoid shorting out components on the circuit board that will go back into the unit. One final little trick, glue them in place so they do not go round when the nuts are attached and tightened. | |||||||||
|
Power
Connection. There are a number of choices available for connecting 12
volt power to the unit. When the two sunshades are removed the leather
padded panel along the top of the roof comes away. It is still held in
place by the Overhead "dome/map light" unit. This can be
removed also by popping the dome light cover and opening the two internal
screws holding it up. You can draw 12 volts from this unit if you are
prepared to remove the bulb from the "map light" and use that
switch to switch the radar unit on/off. This does not affect the larger
dome light which comes on/off every time the car door is opened. In my
case I want for something a bit more elaborate. I had to run the wire all
along the top roof panel, under the corresponding padding over the door,
down the rear door post padding across and down behind the drivers seat,
under the seat and connected it with a +12 volt wire going to a Alpine
Navigational system under the drivers seat. I realize not everybody will
have this option. My suggestion is to poke around under the dash and look
for a connection that is +12 volts when the ignition is turned on.
If you are unsure of this, simply connect the radar lead to the cigarette
leads. The only problem with this is that the power is going to the
radar unit all the time. I have put a switch (and fuse) between my power
to the unit and car.
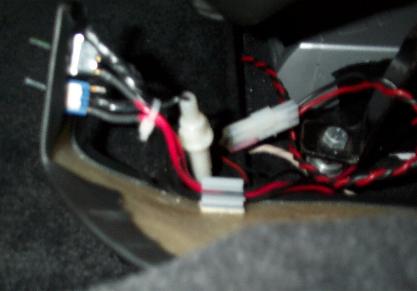
Finally and most important -- of the two wires connecting power to the radar unit, make sure the +12 volt supply goes to the internal ring of the radar power plug and the ground lead goes to the outer ring of the connecting plug. Make absolutely sure you get this right. Before you cut off the cigarette socket plug from the power wire, plug it into the car. Determine which is + and which is ground on this small plug using a volt meter. Write these down and store. |
||||||||||
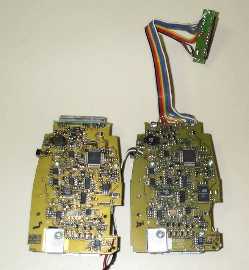
| Display Connection. This is only for those that have experience soldering and de-soldering and are comfortable with electronic circuits. All Bel units have an LED display at the back of the unit. This supplements the voice messages with text. It is difficult to read the text that far away from the driver and to do so, the sunshade has to be down a little. What I have done is removed the vertical LED display board from the circuit board of the Bel unit, attached it to a 12" ribbon cable to it (figure 4) and repositioned the LED display in the overhead dome lighting unit of the Diablo. See Figure 5. | ||||||||||
|
||||||||||
|
The
removal of the LED display from the circuit board of the Bel unit requires
a de-soldering gun and a very steady pair of hands. I use one obtained
from Radio Shack that has a heated tip and a suction bulb. Take care not
to overheat the boards. Do one solder joint at a time. Working your way
across all the contacts. Do not forget the two large contacts on the other
side. When all the solder is removed, flex the LED board, it should come
away easily. Next you need to attach a ribbon cable to each lead on the
main circuit board. Working your way across one lead at a time. Again do
not overheat the board. Then attach the appropriate colored leads to
the small LED display board. Take care you make the correct connections.
Remember the contacts on the back side of each board as well. Now
briefly connect power to the unit taking care you have a 12 volts supply
and the + and - connections hooked up properly as described above.
This is what is lovingly called the "smoke test". If the LED
display shows a meaningless pattern then chances are you got your
connecting leads mixed up. Again be real careful the speaker leads
do not touch any part of the circuit board.
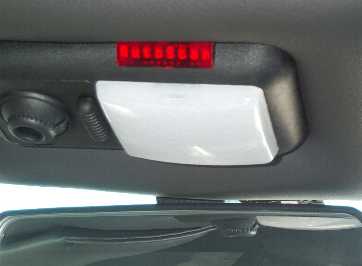
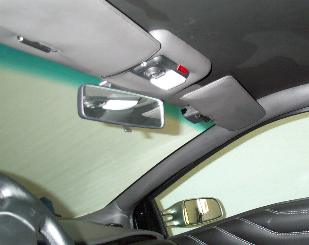
Once you have confirmed that the LED display is correct you are ready to install the unit in the car. Before doing this I sprayed the ribbon cable to the LED board black, taking care to cover both circuit boards before doing so. This helps make the final arrangement less visible. That ribbon cable really tends to stand out otherwise ! Figure 4 shows how I positioned the LED display. Again this is not for everybody because a slight modification to the car is required. I cut out a 1/2 inch by 2 inch (approx) section of the dome light cover. Just enough to slip in the radar units LED display board. If you note carefully I have switched the dome light around so the cut was on the front side. The dome light fits either way! Should I wish to remove this attachment later I can replace the cut out section, fill it in with cement and put it back the right way around. Such a cut is invisible on the front part of the dome housing from within the car. If you do not wish to do this cutting you can simply let the LED display hang out between the dome housing and the roof. It sits there nicely. Installation. This is a bit more tricky than you might think. Essentially you need three hands! What you have to do is first attach the sunshade to the bottom cover of the radar detection unit. Then add the units circuit board taking care to tuck the speaker (and its cover) in its original vertical position. Next carefully tread the power and LED ribbon cable along the roof padding up to the dome light fixture. You need to hold this in place while you attach the top part of the radar unit to the roof tightening in the two screws that held the original sunshade in place. Then the lower half of the radar unit (with circuit board and sunshade) is attached to the upper part of the radar units housing using the two screws supplied with the unit. In the end the unit should look like that in figure 1 above. The sunshade is effectively lowered one inch but still completely functional. When the sunshade is up the unit is invisible both from within and from the outside of the car. To test the arrangement, drive to somewhere where there is a security system that used "X band" radar. In California I find all Safeway stores seem to have this. As you drive into the parking lot it will fire off. When you leave it should stop. Note, these Bel units have a wide range of configurations. I find "Auto scan" mode the best. I also have the "Quick Start" mode on. In this mode the unit does not go through a lengthy series of "diagnostic" squeaks and whistles before coming on. I find this annoying every time I start the car. On these new Bel systems this can now be avoided. The unit issues just one beep when powered on.
|
||||||||||