 |

|
|
|
|
||
Lamborghini Horn Button Repair
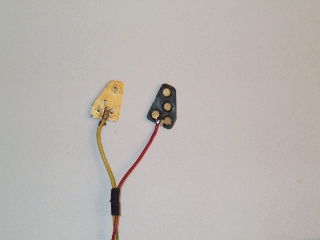 |
There are two buttons underneath the leather on
the steering wheel of recent (and probably all) Diablo's. Each button consist of two pieces of
brass separated by rubber
disks. The brass plates have three spikes on one surface which when the
horn in pressed squashes the rubber separator allowing the spike to make contact
with the other brass plate. This closes an electrical circuit and activates the
horn. Figure 1 shows these brass plates removed from a steering wheel
Apparently what happens with time is that the rubber hardens such that one cannot press the brass plates together. The solution is to isolate these switches. Put a new piece of rubber between them and reassemble the switch. |
|
| Figure 1. Isolated horn switch components | ||
 |
The hard part is getting to the horn switches
themselves. Both of them are nicely protected under the leather arms of the
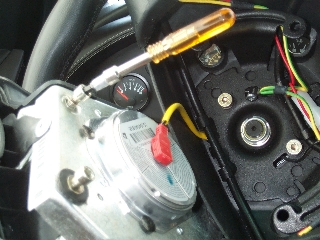
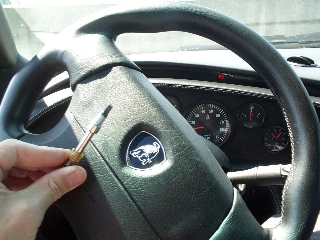
steering wheel. First one must remove the steering wheel air bag.
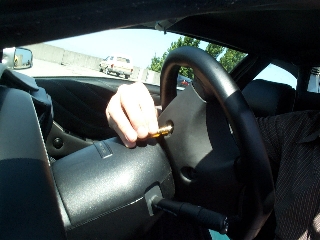
This needs to be done carefully. The air bag is held in place by 4 screws that
are accessible with an Allen wrench from the front of the car's wheel. The trick
is getting to these. I used a hand mirror to locate them while sitting in the
drivers seat. The mirror in one hand and the wrench in the other. See Figure 2.
|
|
| Figure 2. Opening steering wheel air bag screws. | ||
 |
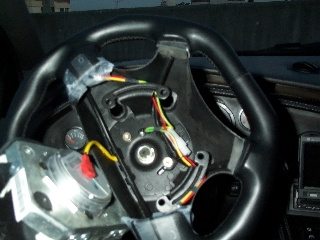
Once the 4 screws are opened the whole air bag
assembly drops out. Please be sure the car ignition is off. Also please
take care not to short or nick the thick yellow wire. It is
important not to disconnect the air bag
lead just let it hang beside the steering wheel. If it is disconnected you
will get an air bag error signal light on the dash that can only be
reset at a Lamborghini dealer that has the appropriate Lamborghini LIE
equipment. See Figure 3.
Figure 3 shows two of the screws that are used to hold the air bag in the steering wheel. There are four total. Note the single wire attached to the air bag. In the background you can see the wires going to the horn switches. These fortunately disconnect allowing the switches themselves to be removed and examined.
|
|
| Figure 3. Opening air bag screws. | ||
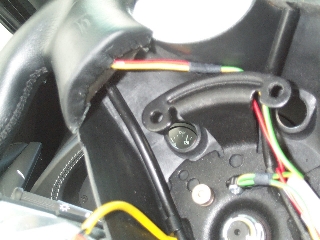 |
Figure 4 shows where the two wires go under the leather to the switch plates. This leather needs to be carefully lifted up and the switches themselves removed. This is easier to do than it seems. The leather is pressed and held in place with an adhesive. It is easy to peel it back | |
| Figure 4. Wires going to switch | ||
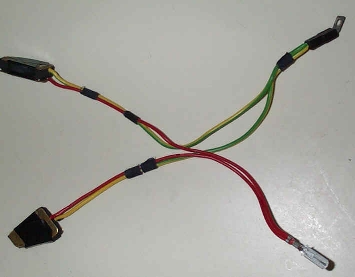 |
Figure
5 shows how the button connecting wires look when they are removed. Note the
simple switch makeup. It is nothing more than two brass plates separated
by a rubber pad and wrapped in tape. The arrangement is primitive but I
suppose functional. OK so we need to carefully open up each switch by cutting the tape. You will find the rubber between each switch has become hard and is in-flexible. The trick is finding a replaceable piece of rubber. By trial and error I found a 1/4 inch piece of black rubber that I cut to shape. I put it between the brass plates and pressed them together. The 3 spikes on one plate made contact with the other as measured with a with a light and battery circuit. Play around with rubber thickness until you get the correct parameters. Note it is important to make sure you have to press hard on the plates for a connection otherwise when the assembly is put back into the car (under the tight leather cover) the horn will spontaneously stay on. Not a nice thing to happen in a parking lot! I erred on the side of needing too much pressure rather than too little. |
|
| Figure 5. Horn switch wires removed | ||
 |
Once we are satisfied with our repaired switche(s) they need to be carefully placed under the leather in the steering wheel and the leather neatly pushed down around them. A few drops of leather glue should be used to hold things in place. I held the leather in place overnight using tape until the glue has set. Note it is important to make sure the leather is even and not wrinkled as you will be looking at your work for a long time afterwards. | |
| Figure 6. Repaired switches back in wheel | ||
 |
Now
for the hard part! It is quite tricky getting the air bag assembly back
into the steering wheel. The four screws need to be put in from
the back of the wheel. I could not find an Allen wrench long
enough to reach, so resorted to cutting one and attaching it to a
screwdriver/nut opener. This is shown in figure 7. |
|
| Figure 7. Device to hold nut in place | ||
 |
There are probably better ways to do this, but with the nut is held on to the Allen wrench using tape wrapped around it, I had something to hold each nut as it is pushed through the opening at the back of the steering wheel without it falling into the wheel. If this happens you have to open the whole assembly to get the nut back and try again. This is by far the most difficult part of this repair operation. A steady hand is needed. | |