 |

|
|
|
|
||
|
One of the most useful things a home DIY'er car repair and maintenance guy could use is a good car lift. While these are not for everybody they really do make life easy for many car repairs. Much of the work to be done on modern cars is from underneath the car. Jacking the car up on jacks and sliding under each time can really ware you down. I was always envious on the ease mechanics at your standard auto repair shop can work on a car. Be it to change tiers or to work on the engine/transmission. My life long dream was to have my own, at home, car lift. These days you can get and install one without spending an arm and a leg. Car lifts come in a number of shapes and sizes. There are essentially three different types. In Ground Lifts. These are fairly massive structures consisting of one large hydraulic cylinder below ground to which four arms are attached to lift the car. The advantage is that take up little floor space. However they do prevent access to the central region of the car. The biggest disadvantage however is that installation is a very elaborate process involving a lot of below ground digging. |
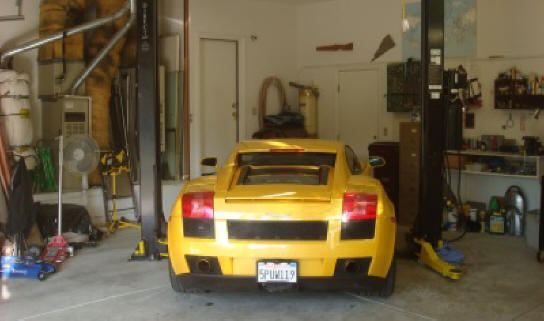
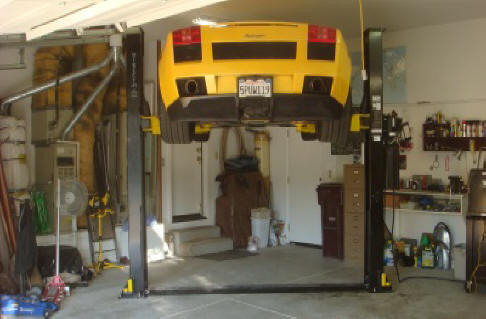 Figure 1. Gallardo Raised With My Two Post Car Lift |
|
|
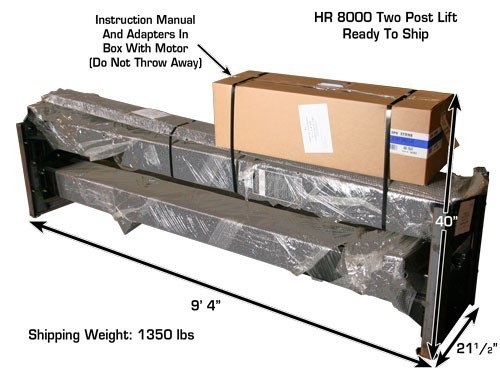
Four Post Lifts. These by contrast are the easiest to install. They can be considered a large bed on which the car is raised. Many come with rollers so they can be moved around the garage. The disadvantage is they offer the least access to the car. The car is raised on its wheels. So if you want to do wheel work you need as well bottle jacks that sit on a cross beam to raise the car on the lift itself. These units are big and take up a lot of room in a small garage. Two Post Lifts. These lifts fall between the two above types. Installation is about a days work. They provide the best access to the car without taking up that much garage space. This is the type of lift I chose. This article describes my experience in setting such a system up. I have it in place now a week. I must say once you have one you never look back. I wish I had installed it many years ago! Direct Lift HR8000After much checking around I decided upon a Direct Lift HR8000. This lift is made in the US by Dover Corporation and sold by a number of outfits. For example Greg Smith Equipment. The price is very reasonable (~$1400). This lift will lift up to 8000 lbs. They have others for larger loads. But since all my cars are less than 6000 lbs that was more than enough. It is very well built, but heavy (see below). The first thing you have to deal with is the fact that all these lifts are large and heavy. Forget having them shipped via UPS! Find a local distributor near you (I used Quality Tool & Equipment in Temecula,CA) and had it shipped from there. Most shipping companies will only ship to a local drop off station. Mine was Hayward 20 miles away. It costs about $370 to ship to there. Then I had to rent a rental truck (>14ft long internal space) and drive there to pick it up myself. The guys at the depot were very helpful. They used two fork lifts to get it on my truck. One to lift the package (fig 2), the other at the end to push/slide it into the truck. The next challenge was getting the lift off the truck at home. I found the easies way was to brake it apart on the truck. Then using two floor jacks with wheels slide the two posts down the steel ramp that came with my rental truck. Ok so we now have the unit horizontally on the floor. We need each post to be vertical. If you have a friend close by, two (defiantly 3) people can raise each post easily. There was nobody around at the time I wanted to install mine and not being the patient type I wanted to do mine then and there. To lighten the load of each post I removed the heavy internal hydraulic cylinder. To do this you slide the lifting beam towards the top of the post. The cylinder itself simply sits in a grove at the bottom of the post and can easily be removed. Next you need to slide the lifting beam back down to the bottom of the post. There is a tooth/claw mechanism you need to disengage to do this. Its important to have the lifting beam at the bottom of the post to lighten your load. Then with one mighty heave, one person can raise the post vertically. Now if you are a professional weight lifter its probably no bother but at ~1000 lbs you need to be strong for one person to do it. Don't hurt your back. If in doubt get help. Next I carefully rocked the two posts into the position I wanted them in the garage. The dimensions and spacing are shown in figure 3. |
||
 |
 |
|
| Figure 2. Direct Lift shipping package. | Figure 3. Lift final dimensions. |
The lift posts are attached to the floor with 5 bolts as shown in figure 4 below. You should have at least 4" of solid concrete to support the lift. Since the total weight of the car rests on this base plate it goes without saying these bolts need to be secured to the ground correctly. Direct Lift supply the 10 concrete bolts. The bolts themselves are 4" long. Once the position of the posts is decided, mark the hole positions and remove the posts. I went through three 3/4 inch masonry drill bits to make the 4'' deep holes. Lots of dust and noise!. I found in the end it's is faster to first drill a small 1/4'' hole, then enlarge it to 1/2" and finally a 3/4'' hole. Next I bolted the posts in place. Then I attached the top pulley to each post as shown in figure 5.
You need a ceiling height of at least 112" for the lift to fit. A Gallardo on this lift at maximum height will fit with a ceiling of 124".
 |
 |
|
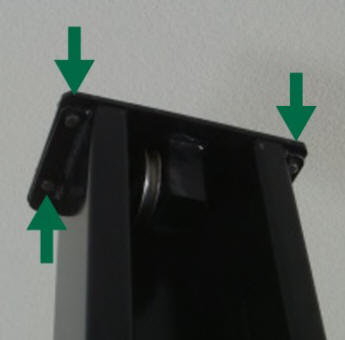
| Figure 4. Base plate bolts | Figure 5. Attach top plate with 4 bolts supplied |
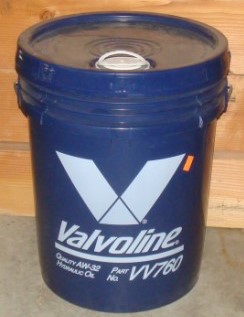
Next we need to hookup the hydraulic system itself. Because the hydraulic oil is under intense pressure it is absolutely essential that leak free joints are setup. The first time I set the system up I found that the oil leaked. I had to disassemble the whole setup and tighten every thing. The power unit consists of a 220 Volt single phase motor which powers a hydraulic pump. The power unit can be mounted on either side. Most people use the passenger side. The unit is attached with four bolts supplied. Next we need to fill the unit with hydraulic oil. This can be obtained in large drums at better auto stores. I got a can of Valvoline AW-32. Fill the reservoir carefully and try not to spill it!.
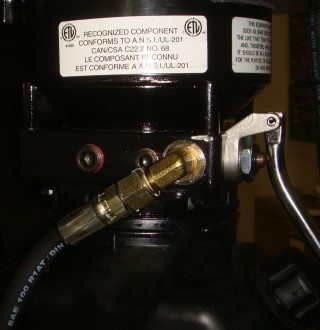
Next hookup the brass connectors. Start with the connector at the pump, Figure 7. I found that a small dab of "Retrorseal T plus 2" paste on the treads really helped seal things. Take care to only put the paste on the treads and don't get it on the inside of a joint as it could clog the pump. The most difficult joint to seal was the 45 degree angle brass joint that goes into the base of each cylinder. See figure 8.
 |
 |
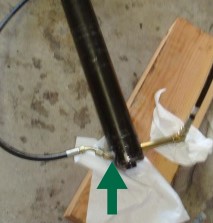 |
| Figure 6. Hydraulic oil. | Figure 7. Pump connector. | Figure 8. |
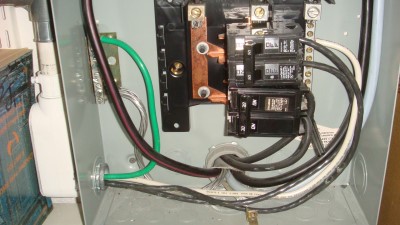
Before you install the hydraulic cylinders it is best to test the system for oil leaks first. To do this you need to get electrical power to the pump. The slight complication is that al these lifts don't work off standard household 120 Volts. You need a single phase 220-240 volt line. Almost all households have a 220 volt junction box which is used for things like a clothes dryer. If you have such a panel in your garage you are in luck. Mine had box with a fuse panel, Figure 9. Now if you don't know what you are doing have an electrician install a 220 volt plug for you. We are talking serious voltages here -- beginners keep away!
The Direct Lift HR8000 came with a short 2 foot three wire cable. I opened the switch box and connected up a 10 foot, 4 wire 30 amp cable. Green to ground, red and black to the two 120v lines (black in fuse box picture in 9).
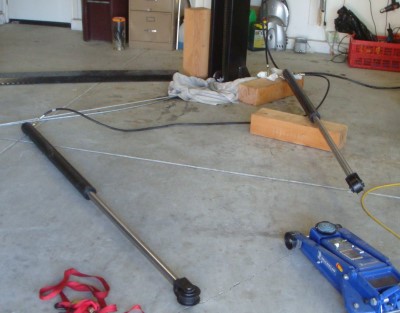
OK, we are now ready to test the hydraulic system. Lay the two cylinders on the ground as shown in figure 10. Turn on the pump and watch the pistons expand. When they are full up the pump will still run. The tubing will swell a little but there should be absolutely no leaks. Switch off the pump but don't release the pressure. Leave it like this for a while to check for any leaks. . Then reduce the pressure. You need to collapse the pistons in the cylinders. Tape open the oil release valve on the pump and push the plungers back into the pistons. It takes some time when done by hand! Then and open the hose - brass connections. Do not open the brass to cylinder connections.
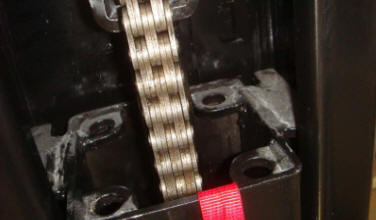
We now need to install the (heavy) cylinders into the posts. There are probably a few ways to do this. The complication is that the cylinders are heavy and you need to lower them into the post between the thick chain. I found the best way is to raise the lift beam arm using a jack several times with increasing rods of mental. Two people can do it by hand. It will ratchet up and lock each time. Raise it well above the height of the upright hydraulic cylinder. Now as an extra measure of safety tie the lift beam up with a rope around the top of the post in case for some reason the ratchet disengaged. With the lifting beam raised the chain is now exposed. It must lay behind the cylinder you will now install (fig 11). The cylinder sits in a grove at the base of the post. Install both cylinders. Then slowly turn on the pump raising the cylinders so the wheels at the top of each cylinder engage the chain. Each chain goes over the top of the cylinder wheel an down the front side where it is attached to the lifting beam. Once both lifting beams start to rise, turn off the pump. Pull the ratchet wire and release the oil pressure at the pump. Both lift beams will slowly drop.
 |
 |
|
| Figure 9. 220 Volt fuse box | Figure 10. |
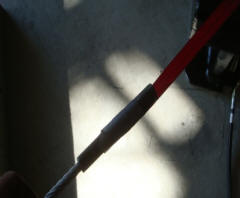
We are now almost done. The only remaining thing to do is install the balancing wires. All these lifts have two wire cables that go between both posts (along the floor in the case of mine). These wires do not lift the car. They simply insure that the oil pressure on both sides is even to have the car rise level. The manual shows how the cables are arranged. What it did not do is explain how to tread the cable through the attachment holes (fig 12). The trick is to drop a rope down from the top of the lifting beam (red ribbon in fig 12) and attach it to the end of the cable (fig 13), pulling it upwards. You can then tread the cable into the appropriate hole and tighten the bolt.
 |
 |
 |
| Figure 11. Base of chain close-up. | Figure 12. | Figure 15. |
Figures 16 and 17 show the Gallardo in the ground and raised position. Note the amount of room to work on the car!
 |
|
|
| Figure 16. Gallardo ready to be raised | Figure 17. Gallardo raised to full height. |
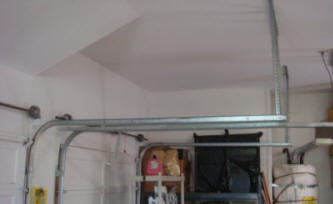
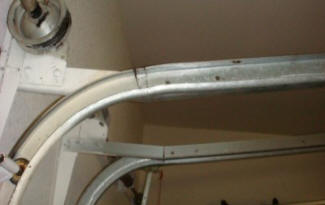
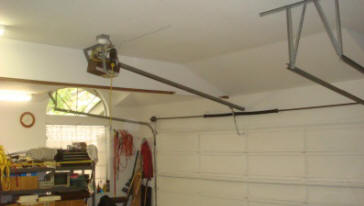
Garage Door Modification.
Many overhead garage openers are of the type that the door is pulled up and then bent at right angles. Normally it is high enough not to be a problem. However a lot of vertical height/space is wasted. In my case I wanted to have as much room as possible. Figure 16 shows the "normal" door arrangement. Note how the rails bend at right angles. I found that you can simply cute a small "V" shaped nick in the bend of the rail and change them to travel upward (in my case 70 degrees) I could get more height. The cut should not be completely through the rail. Just enough to let it be bent without buckling (fig 17). Also with this arrangement the door motor can be raised up into the ceiling (Fig 18).
 |
 |
 |
| Figure 16. "Normal" garage door rail | Figure 17. Rail modified | Figure 18. Raised door motor |
How does it all work. In one word fantastic! My only regret is I did not get one sooner. For some reason I thought they were very expensive and difficult to install. Not so. One solid days work at the most. The biggest hassle is shipping and unloading. Expect more reports form this site about underneath the car!